
Images from licensed sources and others, enhanced using AI tools for illustrative purposes | Edited by nekig.com
cheap DIY pendant light with jute yarn as a tutorial.
I first came across jute pendant lights called Tarek Pendant Light and Walid Pendant Light selling for over $300 at Lulu and Georgia. Upon further research, I found many other retailers selling these types of geometric pendant lights, which are made of wire frames that are hand-wrapped with natural jute fibres or other types of twine. So I wanted to create my own DIY tutorial for pendant lights using jute twine.
Lighting fixtures are usually very expensive, and I’ve already made some affordable pieces for our home, like the macramé lamp, macramé chandelier, DIY pendant light made from wooden beads, DIY ceiling light made from a bowl, and DIY macramé solar lantern for outside, just to name a few. It’s so satisfying to see homemade pieces in your home that are much cheaper.
Which Home Upgrade Does Your Space Really Need?
Answer 5 quick questions to discover the ideas that will work best for your home.
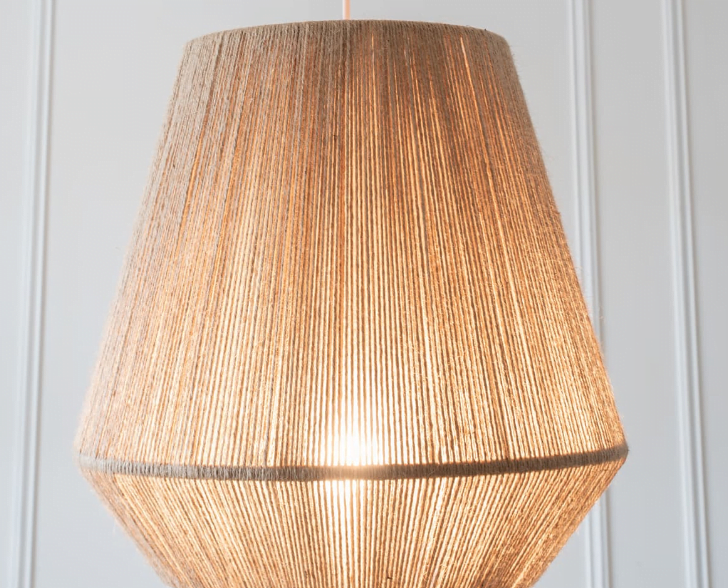
Make a DIY pendant light with jute twine
This post may contain affiliate links through which I receive a commission at no additional cost to you.
See my full disclosure policy.
I love the texture, shapes and overall look of this type of pendant light and wanted to recreate one at a much more affordable price. We have had our sea urchin chandelier for the dining room for a long time. It was one of the few purchases I made in our house and I still love it. But… to be honest, I’m kind of tired of stabbing myself in the forehead (it missed my eyes by millimetres a few times). The urchin now goes somewhere else in the house where it’s out of reach. I didn’t want to spend that kind of money again, and since I’m not a novice when it comes to making my own lights, I thought I could definitely design my own version of a jute pendant light!
Pendant lights made from natural fibres in all kinds of shapes that you can buy on various websites
Materials and costs of the jute pendant lamp
Jute yarn (4 rolls)
white hanging lamp kit/lighting kit
2 used vintage lampshades that have a cage frame ($2.99 and $4.99), the one I used had a bottom radius of 18″
soldering iron
water soluble flux and lead free solder
fine grit sandpaper
wire cutter
small artist’s brush
scissors
small paper clip
plastic pipe (plumbing)
glass dome for the bulb holder (optional)
(I had also bought a metal basket to see if it could be used for this kind of DIY pendant light, but there were too many metal parts to just wrap it with jute. The metal lampshade frames from secondhand lamps were definitely a better choice).
Step-by-step instructions to make this DIY pendant light
1.Start by removing the fabric from the lampshade frames.
2.Cut the rods from the one lampshade frame (that you are not using) so that you can use them as parts for the soldering part. I cut mine to 5 inches long.
3.Sand the gold layer of the macramé ring with sandpaper.
4.Spread the flux on the places where you want to attach the rod parts.
5.Solder 4 of the sticks to the macramé ring from both sides by melting the solder and letting it drip onto the joint. Keep brushing on flux before soldering.
6.It’s time to attach the macramé ring to the top of the lampshade cage frame with the rods.
7.I used tape, removing it each time I went around the perimeter of the frame to solder everything together.
8.I liked using this wide tip to solder the connections.
9.Here you can see the finished cage for the pendant light before wrapping it with jute.
10.Start by attaching the jute twine to the centre ring of the lampshade, which you can loosen later when you are finished.
11.Start wrapping the yarn around the pendant frame but not to tight to make sure the frame doesn’t collapse.
12.When you get to a part where the metal rods are, I just used a small bundle of yarn cut off from the larger bundle so it would fit through the narrow openings.
13.When Tying a new piece of yarn to the wrapped areas because you ran out of yarn, don’t tie it in the center of the pendant because that will be visible later when the light shines through.
14.Tie the yarn together at the middle ring instead as shown. This are isn’t visible when the light shines through.
15.When you wrapped the entire shade with jute yarn, untie the yarn from the center ring piece and tie it to the other piece of yarn for a nice finish.
16.Cut the plastic rod with a handsaw. I cut mine to 7 inches but it depends on what size of lampshade you are using and how far you want the bulb to hang down.
17.I bought a cheap glass pendant cover for safety reasons because I want to make sure that the hot lightbulb never has a chance to touch the yarn should it ever move.
19.Remove the screw at the top of the metal lid so you can thread the plastic rod onto the electrical cord.
20.Now thread the electric cord through the lampshade hole so the entire pendant rests on the plastic rod. Then reassemble the cord and 21.screw through the top metal part the way it was when you bought the pendant light kit.
22.All that’s left to do is to hang the new jute pendant light.
Source By :cuckoo4design